Here I was given an Z-brush model to poly paint and manipulate later in Photoshop based on a theme or animal/s. I decided to base my design on the Marvel character Venom with certain traits of a reptile. For instance I used a mid blue colour for a base and then built up in shades. Once the basis was set I added lip detail with the brush and smaller details using the masking tool to allow me to paint in the crevices whilst leaving larger flat areas untouched. I used the snapshot function to project the web textures to the top of the head and back of the neck and the pupil textures for the eyes.
In Photoshop I added bone texture for the teeth mainly as it was easier to apply onto a flat uv snapshot rather than onto a 3d object which was near circular. This also allowed me to avoid making a texture which was 100% symmetrical.
Uni Work
Wednesday, May 1, 2013
Araora Desert: Photo manipulation
Here is a class task where I was given an image of a desert landscape and had to manipulate
so that the sky was replaced and the original landscape fit to the new sky.
I decided to replace the sky not only with one of night posing the challenge of changing the exposures of light to dark but with the added luminosity of the Aurora Borealis.
Here I have copied the blue channel of the initial desert image in order to isolate the contrast between the sky and land, I further push this contrast by adjusting the settings in the curves menu.
I then duplicate the original layer to create a black and white mask in order to create a gradient mask .
here is the top layer and the sky with the gradient mask showing that it fades at the bottom, this allows for the base layer to hold onto the original colour scheme and have the newly added colour scheme of blues and greens on top as light.
Thursday, March 14, 2013
Wednesday, March 13, 2013
Main model
Here is my nearly finished FV432, will got a lot of work to be done, but the main elements are in place. I've decided to bring out some of the smaller details like rivets, small (bevelled edges and metal extrusions) in the normals as they are too thin and small to waste on my poly count
Thursday, February 28, 2013
Week 3: Block out

Here is the block out of my 432, at the bottom is a template for one of the wheels which will replace the basic cylinders portraying the position of the remaining wheels. The radiation filter is only missing the metal straps that connect it to the 432 body, and small details which I will bring out in the normals.
Week 1.5: Extra Reference
Having told my dad about the project he dug up old
photos of himself using the FV 432 on exercise in Canada
with a different colour scheme and attachments.
Dad in the beret posing atop the 432. Note decal opportunity
with the G56A designation on the side.
On exercise, rolling through the plains.
Close up of the front showing details.
Week 1: Reference
Week 1: went on a class trip to Tank Mania and got reference of a
variety of military vehicles and the FV 432 caught my eye.
Small details.
The cross detail could be put into the normal map.
There is a lot of detail here that could potentially be put
into the normals.
Detailed shot of the side door, note this must be on the right side as
radiation filter and engine is situated on the opposite side
Front shot
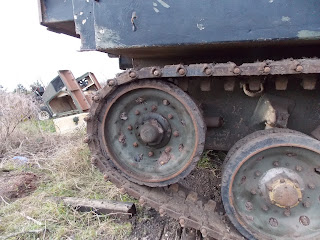
front wheel is diferent from all the others, this wheel
is what pulls the treads along the floor propelling the
vehicle along.
Rear shot of the FV432
Subscribe to:
Posts (Atom)


